Hi everybody, and welcome to my second post for Paper Rose. ( My first post is here)
There’s no doubt about it, background dies are an investment. Especially layered dies. So, having purchased them, it makes sense to get the most out of them. I have a set of cards today using the Paper Rose Circlet Layered background dies. There are three dies in this set, but only one of the cards that I’ve made today uses all three dies. The others use either one or two. I made these cards a while back, but I’m only just getting to share them now, as I’ve had the flu for the past ten days! I’ve had fluvax for the past ten years, only missing it this year. Never again!
IDEA 1 – LAYERING

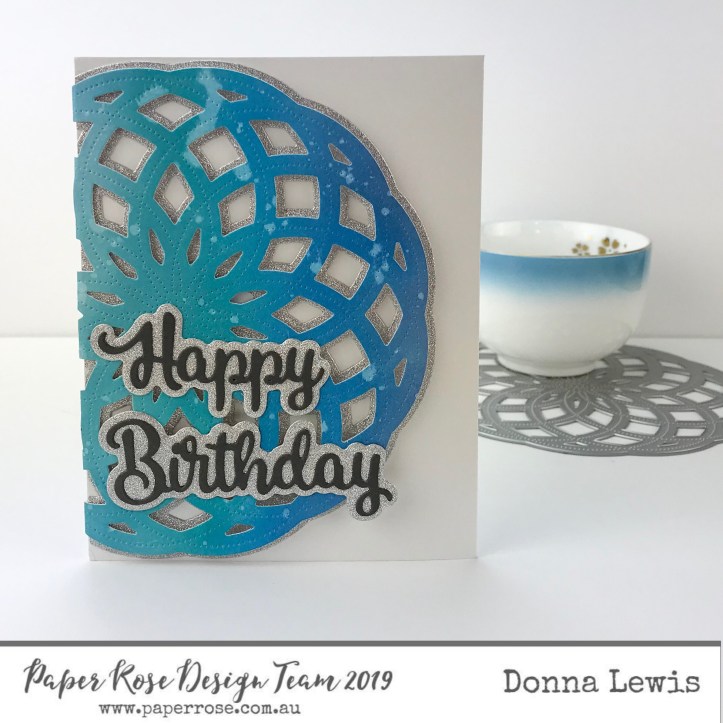
So, onto the first card! I have used all three of the layered background dies for this card, using varying tones of the same colour. I like the way that the darker colour at the back appears to give the card more depth. I used a liquid glue to glue the layers together. The liquid glue gave me a little wriggle time, so I could get the layers perfectly lined up. Because this is such a beautiful big die, only part of the image made it to the card. I think the big size of this die would make it a great choice for 12 by 12 layouts too.
I cut the card using a stitched rectangle die (This die is metric, making it excellent for Australian paper), cut a scripty birthday greeting with background, and my card was done.
IDEA 2- EMBOSSING AND PARTIAL CUTTING

The next card used dies one and three. Die three is makes the thickest pattern, and die one is the thinnest. I ran die three through my Big Shot with an embossing pad to impress the diamonds onto the card stock. Next I cut die one( the thinnest) two times, once from silver and once from blue. I then carefully cut the central flower shape from the blue die cut piece, following the curves that were already there. Finally, to make the sentiment I cut a circle of vellum and heat embossed the word “hi” in silver. The tricky thing with vellum is that glue will always show through, so I just used a little glue behind the word, and let the rest fly free!
IDEA 3 – EMBOSSING AND COLOURING

This is probably my favourite card of the whole set. I embossed die three onto watercolour paper and then carefully cut around the edge of the shape with scissors. I then mixed watercolour powder (Brusho, I think – I should have written it down!) and perfect pearls mixture onto my craft mat and dipped the piece in. Because the embossing was done first, the paint ran into the cracks and faux stitching to highlight the pattern. I used the same colours, but in stronger concentration for the branches, which I cut using the leaf one and leaf three dies. The final touch was the sentiment which I once again heat embossed in silver to keep with the colour scheme.
IDEA 4- CREATIVE CARD SHAPES
This card uses dies two and three. I made a watercolour piece using distress oxides in blues and teals to give some more interest, and also cut a silver layer. However, instead of layering this in the usual way on the front of the card, I made a bi-fold card, and adhered the different layers to different sides of the card. This can be seen in the picture below. 
For this card above I used a smaller Happy birthday sentiment to suit the portrait orientation of the card.
IDEA 5- USING THE NEGATIVE SPACE

Do you recognise these blue and teal pieces? They are the negative space from the card that I showed you above. Actually, I made this card first, while the pieces were all still together. I flipped the die over with the pieces still in it, and added pieces of foam tape behind all the little diamonds. I have to admit that this was a little bit of a fiddle, as some of the pieces popped out a little, and some of the little pieces are tiny, and two of the smallest pieces went for a long walk! Anyway, having corralled all the pieces back together, I really love the look of this card. The little pieces appear to be floating above the card. 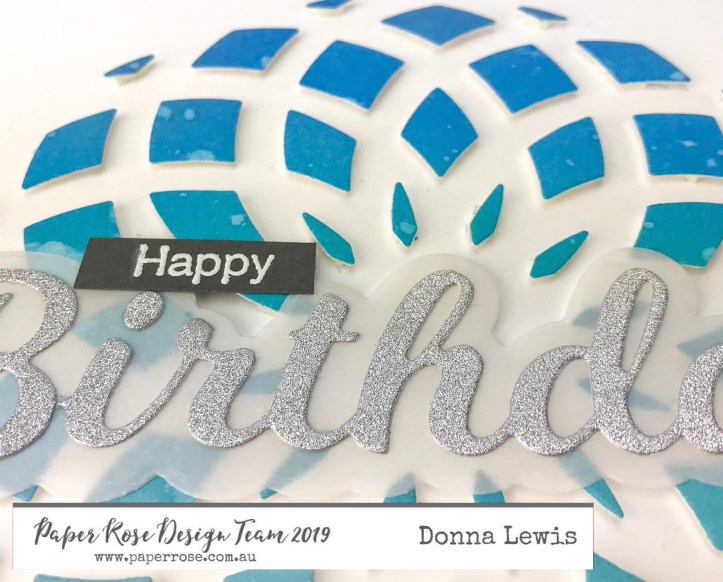
The cards today all have the same colour scheme, but one of the best things that I think you can do with background dies is to either cut or emboss them to have a white tone on tone background, which is perfect for almost any card.
I hope this has given you some ideas of how to stretch your background dies. As I was making these cards, more and more ideas came to me the more I did.
If you are interested in seeing more of my cards, you can always find me on Instagram
I’d love to hear any other ideas about how you’ve used background dies. Feel free to comment letting me know what you’ve done!
Until next time, may you find a little crafty space in your life,
Blessings,
Donna

These are so lovely Donna. The negative space one is incredible. I laughed. I could just imagine you chasing the paper bits around!!!
LikeLike
[…] ideas for ways to stretch them further. For more ideas, you can have a look at an earlier blog post here, which also used layers of background […]
LikeLike